
Learn how to make Alton Brown's Spatchcock (or Butterflied) Dry Brine Turkey from how it is to spatchcock a turkey for a home chef to what seasonings you can use. Read through my full review and see why we think it's the best turkey you will ever make.
🦃 Why You'll Love This Turkey
This post includes affiliate links. This means that, at no additional cost to you, I will earn a commission if you click through and make a purchase. These are products and services I recommend because I use or trust them. Cookies will be used to track the affiliate links you click.
Jump to:
It's been over a decade now since I eagerly watched with much anticipation Alton Brown's Countdown to T-Day. The Good Eats episode Romancing the Bird is a classic that influenced me so much in the kitchen. I really wanted to see what Alton came up with. His original turkey recipe is beloved by so many. It's the most commented recipe on all of Food Network's website. How could you top that? Alton presented a new method.
Is it better than the original Good Eats turkey? Read on to see why over a decade later this is the turkey I make every Thanksgiving.
🚩 Problems with Wet Brine Turkey
When you think of brining a turkey you think of doing it in liquid. This turkey is different because it uses a dry brine instead of a wet one. Why? Alton identified some problems with the wet brined turkey.
- The skin doesn't crisp up well.
- The drippings are too salty for gravy making.
- If you brine it too long you end up with mushy meat.
So how does one fix this problem. Get rid of the water. And then spatchcock!
✂️ Why Spatchcock a Turkey?
But without the water won't the turkey become too dry? That is where the butterflying or Spatchcock method comes in. By removing the back bone with shears or an electric knife and flattening the bird out you can cook it faster. Cook the turkey faster than it's less likely to dry out.
🗒️ Notes on spatchcocking a turkey - Removing the back bone is never as easy as Alton makes it look (see the video I posted below). It took me a bit of struggle to get all the way through. I normally use kitchen shears. Make sure they are sharp before attempting this. You also could use an electric knife. I saved the back bone along with the neck and giblets. Then I made a stock on the day I cooked the turkey
💡 Tip - Don't waste the neck or the giblets that come with the turkey or the bone that you cut out. Use them all in making my Overnight Giblet Stock for Gravy
🛒 Ingredients
For the turkey itself look for something in the 12-14 pound range. Larger turkeys are going to be harder to manage. If you need more meat, you can do two turkeys, or a turkey and a turkey breast. Do you need ideas for cooking a turkey breast? Check out 5 Mouthwatering Ways to Cook a Perfect Turkey Breast.
Use either a fresh turkey or a thawed frozen turkey (see my post - Fresh vs. Frozen Turkey - Which to Buy & Why)
RELATED - How Far in Advance to Buy a Fresh Turkey
Here are the ingredients Alton recommends for the dry brine. If you go with a turkey bigger than 14 pounds, you will need to increase what you use.
- 3 ½ tablespoons kosher salt
- 1 ½ teaspoons rubbed dried sage
- 1 ½ teaspoons dried thyme
- 1 ¼ teaspoons whole black peppercorns
- ½ teaspoon whole allspice berries
You can custom this to your liking and what you have on hand. Stick with the amount of kosher salt. You can add ½ teaspoon to 1 ½ teaspoons of any of these : dried rosemary, garlic powder, onion powder, dried orange peel, brown sugar, etc. Be creative! You can even add some cayenne pepper if you like things spicy!
I made up the dry brine in my electric coffee grinder that can double as a spice grinder (as long as you clean it out really well).
You want to try and find rubbed sage instead of the more powder stuff. It is more potent. It was made by rubbing the sage leaves through a mesh screen. If you have a bigger bird you may need to make more, just try and keep everything in proportion.

Last year I was given a turkey brine kit from Redmond Real Salt to try out. I love their salt so much I just had to try it out! I made sure to dump some of the kit into a bowl so I wouldn't be touching the bag with my dirty turkey hands. If I needed more I asked my wife to pour more in the bowl for me. I had some leftovers that I ended up using for another meal down the road.
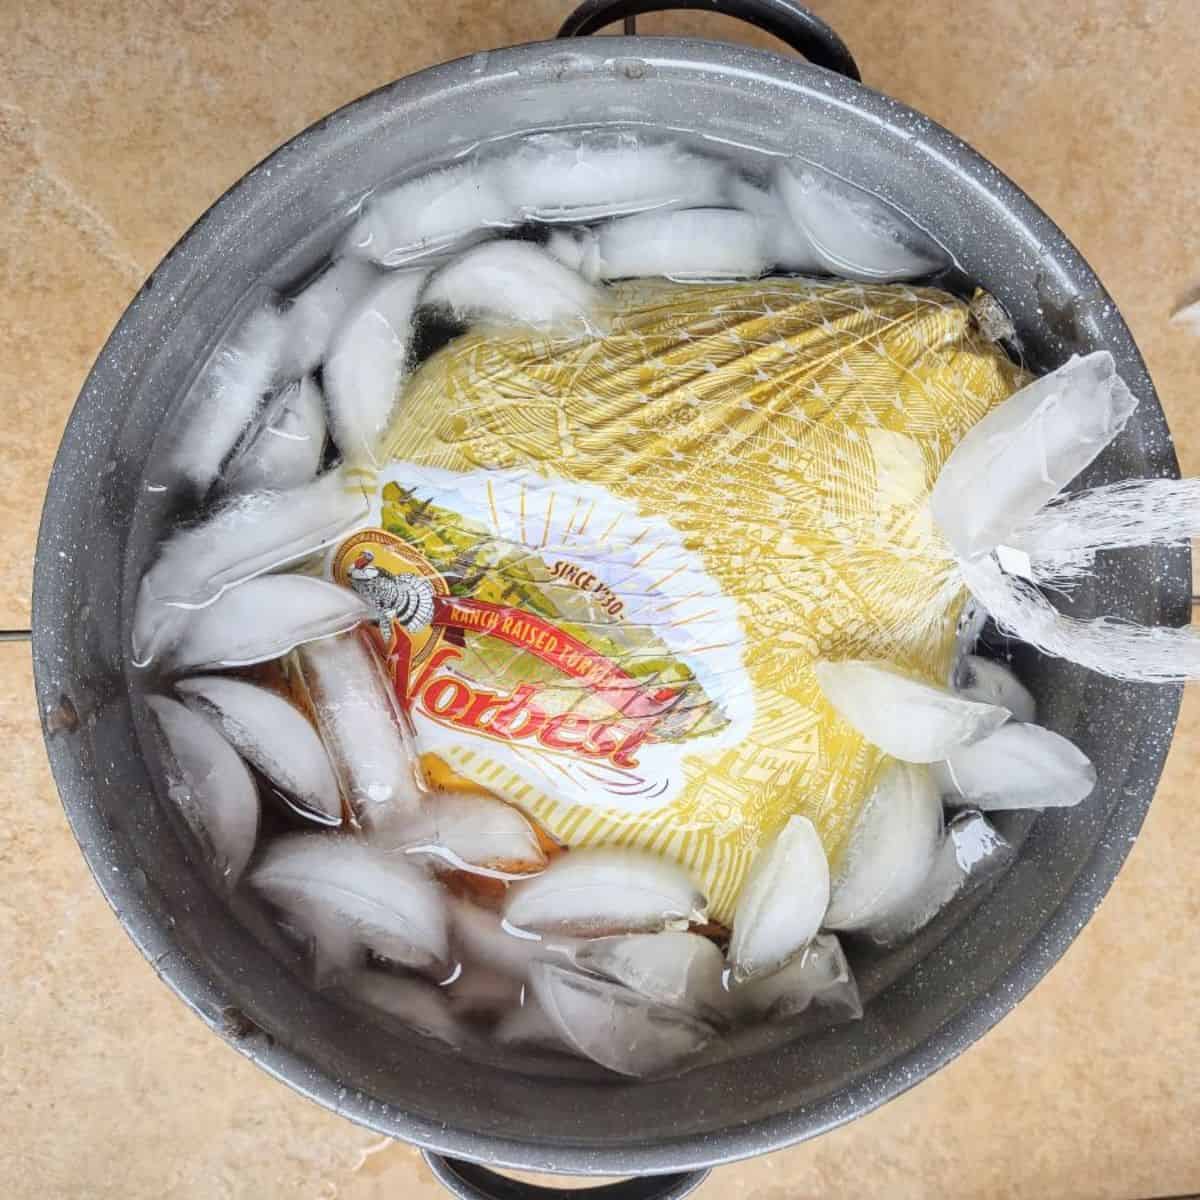
🧊 How to Thaw the Turkey
In order to begin this process your turkey must be fully thawed first. You won't be able to cut through a turkey that is frozen. I have spatchocked turkeys that were just barely frozen in the inner cavity. It can be done but it is a lot harder, mainly because of how cold your hands get.
In order to start the brining the turkey in time for Thanksgiving, you will need to have a thawed turkey by Sunday. You have two options:
- Buy the turkey about a week or so before Thanksgiving, giving it 3-4 days to thaw in the fridge.
- Or keep in the freezer until the Sunday before and that morning do the quick thaw turkey method. This involves placing the turkey into a bucket of ice water until it's thawed.
If you want to learn more about how to safely thaw a turkey and how long you can expect it to take check out one of my most popular Thanksgiving blog posts - How to Quickly Thaw a Turkey. I will take you step by step through the process and show you what thermometer I use to make sure the temperature of the thawing turkey never goes above 40 degrees, in which bacteria could begin to grow.
📅 Timeline
Here is the timeline on when to buy, thaw, and cook this turkey in time for Thanksgiving Day, starting with the weekend before .
- Saturday - Buy a frozen turkey. The turkey goes into cold water which you should change every 3 hours or so. Use a brick if the turkey floats, it needs to be fully submerged. The rate of defrosting is about 2 lbs every hour. If you are using a fresh turkey you can proceed to the next step.
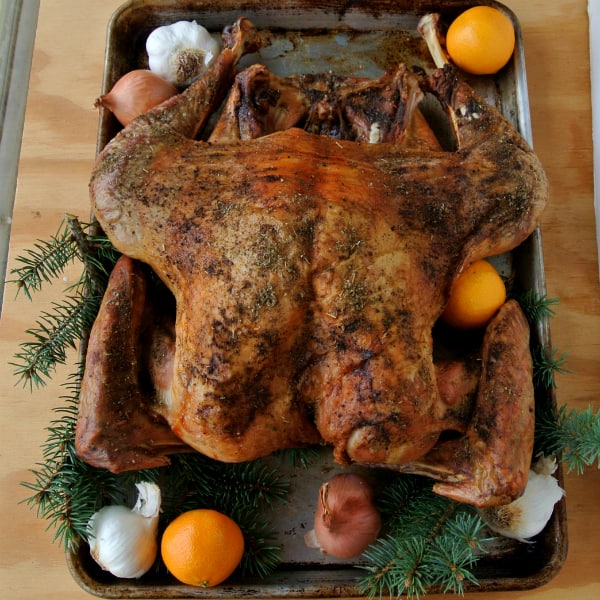
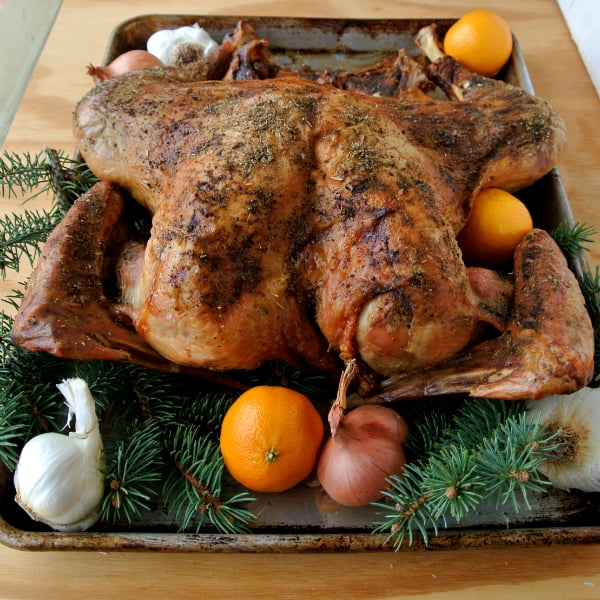
- Sunday - Spatchcock the turkey as we discussed above. Place the turkey on a sheet pan that will fit in your fridge. Add the dry brine. Try to distribute the dry brine as evenly as you can get it, on both sides. Use all of it, even if you think you don't need to.
I am fortunate to have a good sized fridge so I managed to get it on in without touching anything. That's the key thing you don't want other food touching it. You are suppose to leave the turkey uncovered for 4 days. This is a kind of dry age method like top notch steakhouses do with their steaks.
💡Tip - Before you start this process it's a good opportunity to clean out your fridge. See what you can use up the day before or if there is anything just hanging out in the fridge that should be tossed.
If you are worried about the turkey being uncovered 4 days keep in mind that you are adding salt to it which helps preserve the turkey. I have done this many times and no one has ever gotten sick.
")
Compare the two photos of the raw turkey. You can see the skin has dried out and appears more translucent. This is your first step towards crispy skin!
")
- Thursday - On Thanksgiving Day, you just have to put the turkey in the oven. There is no other prep for the turkey. That is the beauty of this recipe is that the bulk of the work to prepare the turkey is done early.
Please read - The turkey may look strange at this point. Especially the dark meat that can take on a purple color. Do not worry. This is normal. I have seen it every time I make this turkey and it always comes out delicious.
If you don't have enough time left to brine it, read my post I Don't Have Time to Brine My Alton Brown Turkey. Also you can dry brine a boneless turkey breast in half the time and then cook it in your air fryer.
👨🍳 Cooking Instructions
Here are some notes from my experience cooking the turkey itself. But before we get into the nitty gritty, we need to talk thermometers. The only way to know 100% for sure that your turkey is done is to check it's temperature.

As Alton is himself, I also am a fan of ThermoWorks. Their thermometers are so high quality, so accurate, and the people that make them are fantastic. I got to tour their building in American Fork, Utah and it was amazing.
I like having to two thermometers on hand.
- The Smoke X to monitor the temperature is both the breast and the thigh
- The Thermapen® ONE to spot check other parts of the turkey if necessary
🎙️ Check out the podcast episode I did with Chef Martin from ThermoWorks, where he talks about how to properly temp a turkey for success each and every time.
Now let's talk about cooking that turkey.
- To roast the turkey you place it directly on the oven rack. That may seem weird but there is a very good reason - panzanella. You place the roasting pan
 would have used for the turkey in the rack underneath it. It is filled with cubed root veggies. The drippings fall down onto the veggies adding flavor.
Alton's panzella has parsnips, red onion. Brussels sprouts, cubed bread, garlic, vinegar. and fresh thyme. You can use whatever you want. I often do parsnips, rutabaga, and carrots. Sometimes I have included celery root. Try to cut your veggies so they are even in size. And if using Brussels, I shred them, and add them after the turkey is done and you are just finishing cooking the veggies through. I believe the vinegar is optional, I don't really like it when I added to to mine, so I skip it now.
If you are not going to do the veggies you can either place a sheet pan to check the drippings under the turkey or cook the turkey itself on a sheet pan or in a roasting pan.
- Roast at 425 degrees for 30 minutes. Then reduce the heat to 350 degrees until a thermometer reads 155 degrees when stuck into the deepest part of the breast. This is suppose to take about 40-50 minutes.
My turkey was done at right around 90 minutes, that is when the internal temperature reached 155 degrees. Carry over heat brought it the perfect temperature of 165. I was excited to have nailed that temperature perfectly.
How to remove the turkey - Since the turkey cooks directly on the rack, removing it can be a challenge. I found that sturdy metal spatulas, like you would use for the grill is the best way to remove it. I highly recommend picking some up before cooking the turkey if you don't have them as it will make your life so much easier and your stress less! What also would work, although I haven't done it myself but a pizza peel might be an even better option. You could either get a wood pizza peel or a metal pizza peel.
⭐ Review
I want to take a few moments to give you my thoughts on the recipe and then I then I end I included the recipe with how I did it in my own words.
Let's start with one word - Unbelievable. I love the original Good Eats Roasted Turkey, but we have a new champion.
The meat was so juicy and flavorful, particularly the dark meat. Even the inner most part of the breast takes like the dried herbs. I also liked the ease of this recipe. The hardest part, the spatchcocking was done days before I had to cook.
I never stress about preparing a turkey on Thanksgiving anymore!
The root vegetable panzella has become one of our favorite Thanksgiving sides. It's like a different way to do stuffing that doesn't slow down the cooking of the turkey.
Major kudos to Alton for not resting on his laurels and coming up with a new Thanksgiving hit!
🦃 Another New Turkey Recipe
Alton Brown published a cookbook called Everyday Cook, which if you are a fan of his, you need to get it. In it he has yet one final turkey recipe. This one he cooks in a giant cast iron Dutch oven. I don't have one large enough to fit a turkey so I haven't given it a try yet.
He also published a new turkey recipe in this Good Eats 4 - The Final Years book, that is a wet brine with some different ingredients.
Have you used one of Alton Brown's turkey recipes before? Tell me about your experience. Leave a comment below.

🥔 Side Dish Ideas
Besides the root vegetable panzella, what other sides can you serve with this turkey? To make life easier I try to avoid having to do much with the oven itself, so the turkey can have that space unless I am doing a quick thing while the turkey rests before carving.
- For mashed potatoes, I like to either make my Instant Pot Mashed Potatoes or Use My Air Fryer to Cook My Potatoes for Mashed Potatoes. That way the stove isn't needed for them.
- For the cranberry sauce, I always do this ahead of time, not the day of Thanksgiving. Try out my Cranberry Sauce with Fresh Blueberries & Cardamom or my Sous Vide Cranberry Sauce.
- While the turkey is resting is when I use the stove top to finish my Instant Pot Smoked Turkey Gravy and Shredded Brussels Sprouts with Bacon.

Alton Brown's Dry Brined, Spatchcock Turkey with Root Vegetable Panzanella
Ingredients
For the turkey
- 1 ½ tsp black peppercorns freshly ground
- ½ tsp whole allspice berries freshly ground
- 1 ½ tsp dried thyme
- 3 ½ TBS kosher salt
- 1 ½ tsp rubbed sage
- 13-14 lb whole turkey fresh or thawed frozen
For the root vegetable panzanella
- 2 lbs combo of parsnips, rutabaga, turnips, celery root, and/or carrots peeled and cubed into ½-inch pieces
- 1 tsp cooking oil
- ½ lb red or yellow onion diced into ½-inch pieces
- 8 oz Brussels sprouts shredded on the thin slicing blade of a food processor
- 8 oz hearty bread like sourdough cut into ½-inch cubes and staled
- 2 cloves garlic minced
- 2 tsp fresh thyme leaves chopped
- Kosher salt to taste
- Freshly ground black pepper to taste
- ¼ cup apple cider vinegar optional
Instructions
Preparing the turkey
- 4 days before you are going to cook the turkey or the Sunday before Thanksgiving make sure you have a completely thawed turkey. Remove the neck and giblets and save them for stock in the fridge.
- Add all the turkey seasonings together in a coffee grinder and grind together if you can. Otherwise use pre-ground allspice and a pepper grinder and combine with the rest of the seasonings and place them into a bowl.
- Place the thawed turkey, breast side down on the largest cutting board you have. Make sure you have nothing near you that could get ruined if touched by turkey parts or juices. I like to have towels nearby for any messes.
- Using a pair of good quality kitchen shears, cut up one side of the backbone. Then cut up the other side until you completely remove the backbone. Save the backbone to make stock.
- Now flip the turkey so the breast side is up. Use you hand to press down on both breasts until it cracks and the turkey has flattened out. I found that if I stand on a step stool carefully and push down on the turkey it makes it easier but only do that if you are comfortable. Don't hurt yourself!
- Now liberally rub the seasonings all over both sides of the turkey. Make sure to use it all.
- Now place the turkey breast side up on a sheet pan lined with parchment paper. Place on the bottom shelf of your fridge uncovered for 4 days.
Cooking the turkey and panzenlla
- Take the turkey out of the fridge, 1 hour before you are going to cook it to start bringing up it's temperature. A turkey that isn't fridge temperature will cook faster and more evenly.
- Place the peeled and cubed root vegetables in a roasting pan or a large sheet pan if you don't have a roasting pan. Toss with cooking oil. Set aside.
- Make sure you have a rack in the middle of your oven and the second one is just far enough below for your roasting pan or sheet pan with the root vegetables to fit.
- Now heat the oven up to 425 degrees.
- Once the oven is heated up, the turkey goes right on the middle rack. Make sure the legs are running perpendicular to the metal bars.
- Place the root vegetables below the turkey and close the oven door.
- Cook for 30 minutes, before dropping the temperature down to 350 degrees for the remainder of the cook time.
- Cook until a thermometer reads 155 degrees when inserted into the thickest part of the breast. Carryover heat will continue to cook the bird until it reaches 165 degrees. On average it takes about 40-50 minutes for it to reach this temperature but don't go by time, check the temperature to be sure.
- Remove the turkey from the oven and allow it 30 minutes to rest.
- To finish the panzenlla, add in the Brussel sprouts, bread cubes, and garlic. Stir everything up and cook for 15 more minutes. Then pull from the oven, season with the thyme, salt, and pepper and the vinegar if you want to use it.
- Carve the turkey up and serve with the panzanella.
Christy
This is really interesting! I think I may have to try this one out! Sounds super easy (which I love), quick and delicious. Thanks for sharing!
rizky
Your Turkey looks wonderful. Im sure it was delicious. Did you have to baste it?? Or put butter before??
Eric Samuelson
No need to baste or put butter on it. The skin was perfectly crisp and it was seasoned all the way through the meat.
xania
Hi! I realize this is an old post
Your turkey does look wonderful - and I am happy to hear that you enjoyed it. THAT really makes me feel a little better now.
Yes, I am making the same Dry-Brine recipe as you for our Christmas this year.
I just checked on ours - whoa. Ha! 🙂 It's been about 2 days - and my bird's thighs and wings are red and the rest are still that white/pinkish skin color - but the skin feels dry. I was worried about going the whole four days.
No one got sick, right? Just double checking 🙂
I do have a question - I'm not doing the veggies underneath - so, do you think cooking it in a rimmed cookie sheet on a rack so it won't sit in it's juices a good move? In my mind it works.
Thank you and Merry Christmas.
xania
Eric Samuelson
The skin will seem to try out. Sounds normal. I have done this method many times now and has never had any problems. The skin is always super crisp and the meat is flavorful.
Your idea to cook the turkey should work out. The veggies underneath are super tasty and I have also cooked dressing underneath too, but if you don't want either, go ahead with your plan.
Angela
Super excited to try this recipe this year. I've wanted to try spatchcocking a turkey for a while now, and I have reason and means to do it this year!
One genuine question though. The recipe mentions putting it directly on the oven rack with the drippings to go through, which is cool. But how the heck did you get the turkey off and out of the oven when it was done? A couple well skilled hands and spatulas? Haha
Kudos for your blog post. I'm glad someone has such a well documented attempt and show of how it turned out. I am indeed really excited about this.
Eric Samuelson
I love your excitement.
I use two good, sturdy metal spatulas that I got from the grilling section at the store. Without those I struggled to get the turkey off.
Linda
I used this recipe last Thanksgiving…it was fabulous!!!
It is now my go to for turkey! Thanks so much for the recipe.
Eric Samuelson
It really is a great recipe.
Sheryl K
I want to try this recipe using my electric roaster.What are your thoughts on this?
Eric Samuelson
I would rather use an oven every time. I think it will do better job. If you must use an electric roaster, then be sure you are using a thermometer to keep track of the temperature.
Audrie Campi
Do you think a large pizza peel (already have on hand) would get the turkey out if placed directly on the rack?
Eric Samuelson
Yes you could do that. I would use the peel and then move onto your cutting board right away and immediately clean the peel.
Audrie Campi
Day three of dry brine after spatchcocking and checked the bird - LOTS of fluid in the baking sheet! I used a paper towel to soak up and dispose. I really thought I fully dried the bird with paper towels. Not sure if I should resalt. And THANK YOU for the response on using my large pizza peel to move the bird from oven rack to cutting board for resting.
Eric Samuelson
Thanks for coming back! I usually have some fluid but never much I would call LOTS! I don't think it would re-season it because the risk if overdoing it would be too high. My guess is enough of the seasoning has made into the bird. I would love to hear how it turns out for you.